Friday, December 7, 2012

1995 Ranger Project - Engine Bay Clean Up


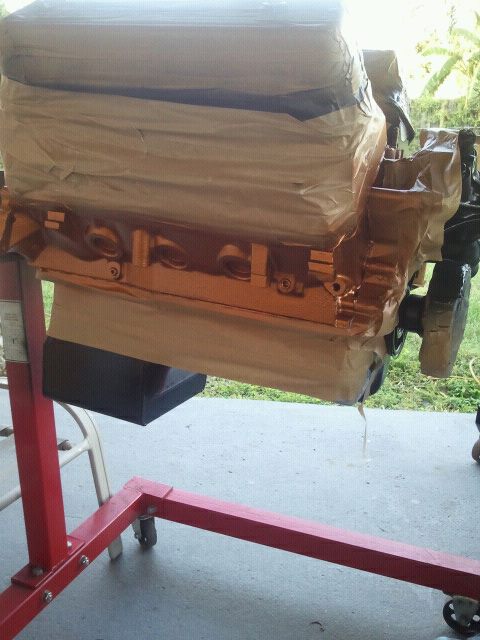
The majority of the rebuild process is cleaning up and polishing the details from the mock up process. Case in point the engine bay, while its functional its far from pretty. So, this post is detailing the steps taken to make this from pig sty to beauty queen, after all we have a beauty of a twin turbo V8
to drop in here.

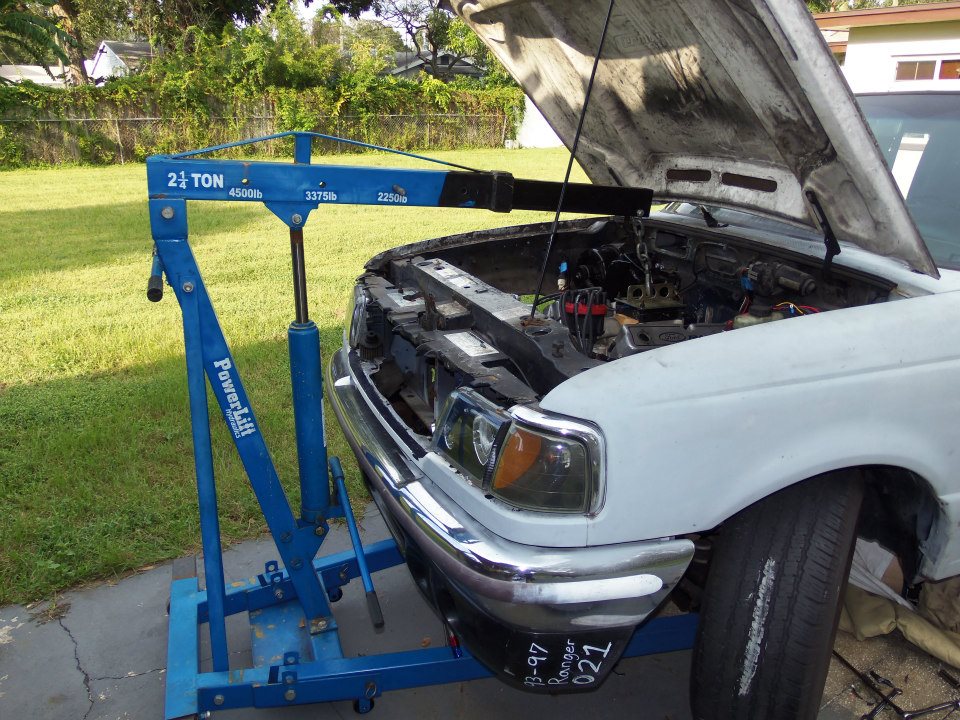
First step removing the motor so it can be clean and painted as well to match the new paint scheme for the truck and well as get some more mods to prep for the turbos. 4 bolts holding the motor to the mounts, a couple hoses and an engine puller make quick work of removing the engine. Now for easier removal and since we are prepping the bay for paint. We went ahead and also removed the radiator, steering arm and box, air conditioner housing and transmission. 


What we're left with is this greasy multi-colored rust hap hazard of an engine bay, but that will quickly be fixed. First step degreasing and pressure washing. This will be nasty and get crud everywhere around the car so do this somewhere that can be cleaned easily. Take time to tape off and remove anything that can suffer water damage and shouldn't be painted later. Once cleaned use a 80-100 grit sand paper to prep the frame for paint, this will remove any surface rust left and ensure a good bond for the paint. I recommend using a brake line fluid resistant paint, as that is some corrosive stuff and will ensure long lasting paint even after a spill or two. As for the rest of the engine bay. Go over it with 100-120 grit paper and remove any rust, stickers and feather out any deep scratches. Extra prep time here will ensure a better outcome then rushing though to the painting process.


The paint process should be done in a 2 step process. First layer is a rust sealer/primer to stop any further damage, followed by your color of choice. We are going with 2 colors satin black for the frame and the rest flat black. Like before when painting stay 6-12 away using several light edge to edge passes. Allowing plenty of dry time in between each pass. 

With the final color on, we put the newly painted engine back in
(see our other posts for the engine clean up and paint)


Tuesday, December 4, 2012

1995 Ranger Project - Center Console 2.0 Build

While our project Ranger already had a console we built in a previous post, it was basic and temporary. The position of the gauges were a little awkward for the driver and the shape and finish need some improvements. So we began from scratch making a new sleeker, more driver friendly version. Utilizing less gauges and more shapely style to match the curves around the rest of the cabin.


We started by going back to the drawing board literally. After several ideas of what we wanted and didn't want and what we liked and didn't like about the first console. We came up with basic sketch of what the new one should resemble.


Once decided upon we used the old console as a template so we could match the floor with out making another cardboard cut out like in the previous post. Using 1/2 MDF and a jig saw we mocked up the rough shape of the new console. This one will only be using two gauges and no shift light, so the width could be reduced to allow the seats to sit in further making more room for the seat belts. To sink the gauges into the console, I first used a whole saw bit to drill a 45 degree angle for optimum driver line of sight. then used a piece of 1/16 thick steel to shape the pockets for them to sit in. Tip, you can use the gauge itself to form the circle in the steel so its a perfect fit. Simply start by holding the steel on to the housing and roll the metal around the gauge until you overlap the starting position. This will be a loose but close fit. You'll just need to hand roll the tightness into it from here.

 We assembled the pieces using 5/8 counter sunk wood screws to allow a smooth finish.
Then cut out our rough openings with the jigsaw and applied a light but generous coat
of filler to start roughing out the shape.


Using some painters tape to cover any gaps on the inside will stop the filler from filling in unwanted areas. From here allow ample dry time, and let the sanding fun begin. Using a 60-80 grit paper will speed up the process but be careful not to take to much off MDF is easy to sand and can easily be overworked. 

With the first round of sanding completed check for fitment and and any clearance issues unforeseen.


With fitment checked time to add another coat of filler if needed.
Ours only need a little coat to fill in some small areas so we got lucky.
This time use a light 100-120 grit paper so smooth everything and
start to get the final shape.


Check fitment again and if all is well like ours, its ready to be sealed and painted! Next we will make the inserts and cup holders to finish this piece and do the final install.


1995 Ranger Project - Flex-A-Lite Fan Install

Fans are one of the most important part of this truck since we are using a small radiator to save space. We needed hi-output with minimal room being used. To solve this equation we got a set of flex-a-lite dual fans (originally made for a Tundra) and modified the trucks front radiator support to accommodate.  As you can see its a snug fit but they do work perfectly, we just needed to clean up the area and remove some excess metal to allow maximum air flow to the fans and radiator.


While the engine was removed and before we painted, we marked the area not being used by the core support and hood latch to remove as much material as possible. We didn't want anything restricting out much needed cool air flow or getting in the way of our massive innercooler also being added in the area. Using a simple silver metal marker we marked it out and used a combination of diegrinder and air saw to remove the metal leaving a small lip all the way around. This lip was left on purpose, this way we can roll it around the remaining metal giving a smooth un-jagged finish that won't cause any cuts or issues of fraying later.


We were able to remove a large amount of metal with out effecting anything and we went ahead and removed the old radiator mounts since the were no longer needed just to save weight and clean up the engine bay a little more. We also found a couple rust holes in the support that we went ahead and patched while the area was easily accessible. 

The finished result was a perfectly fitting hi-flow minimal room set of fans that will
keep this truck cool and any temperature.


1995 Ranger Project - Engine Cleanup & Prep


Our Ranger project engine had seen better days looks wise. Once a nicely painted red, mock ups, changes and problems needing solving had done their best to tarnish this gems appearance. So, we fixed that and gave it a face lift to match the trucks new outward appearance. 

Starting by again degreasing the entire block, removing the old manifold (which wouldn't be being used again), removing the accessories, headers and also the distributor. This left us with a mostly bare block and heads, which we then taped off to allow the re-color. We also added a Victor Jr manifold and a
hi-output water pump from Edelbrock, along with a set of header for out turbo system.


Before painting anything DEGREASE, DEGREASE, DEGREASE!!!!!  The motor will have oils, lubes, gasket maker, sealant and god knows what else on it so a thorough bath will be need first and up most. And because, we are using multiple colors its important to layer the tape correctly. Since the heads and oil pan are mostly smooth its easiest to paint these first, so you don't have to worry about taping off the block any over spray will be covered up later by its color. Once they are painted use masking tape to cover the areas you don't want painted the second color, like you see above. We went with satin black heads, oil pan and water pump with a Dupi-Color copper block, the result you can see below is amazing.


Featured Rides - 2006 Suzuki GSXR 750


Newest addition and upcoming project. This 2006 GSX750R. It already came with a slip on HMF exhaust pipe, a Double bubble windscreen, and stainless steel braided brake lines. I plan to change the colors, install a power commander with a TRE (timing retard eliminator), lower the bike and extend the swing arm. Also going to paint the wheel (possibly replace them with some forged PM wheels) along with several other mods. So stay tuned for tune-up tips, mods and performance upgrades!